Start a Basic FreeRTOS Program on the Pico 2W
A complete example project built by following this guide is available as a downloadable zip.
Create an empty project
Section titled “Create an empty project”Create an empty project in VS Code using the Raspberry Pi Pico plugin.
We’ll name the project FreeRTOS_pico2w (this name will be used later
when editing CMakeLists.txt).
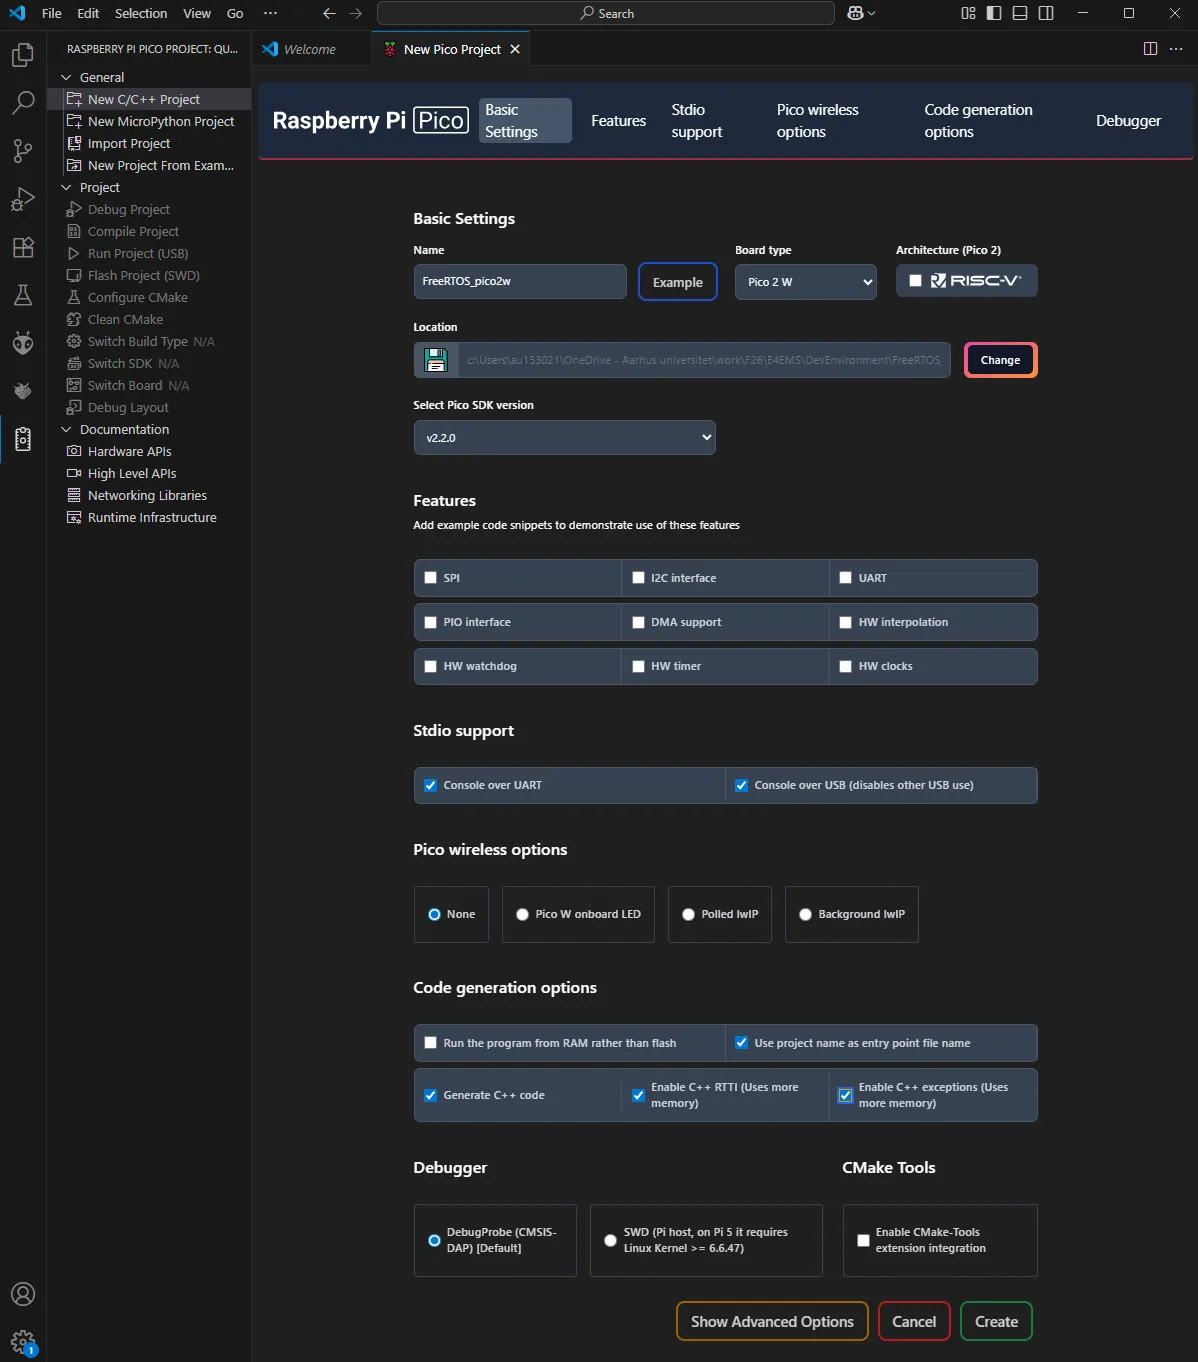
In this example, stdio support is included on both UART and USB, because a second RPi Pico 2W is used as a debugger and stdio on the UART is relayed by the debugger to the virtual COM port on the PC.
Download the RP2350 FreeRTOS port
Section titled “Download the RP2350 FreeRTOS port”Download the FreeRTOS RP2350 port from https://github.com/raspberrypi/FreeRTOS-Kernel/tree/main.
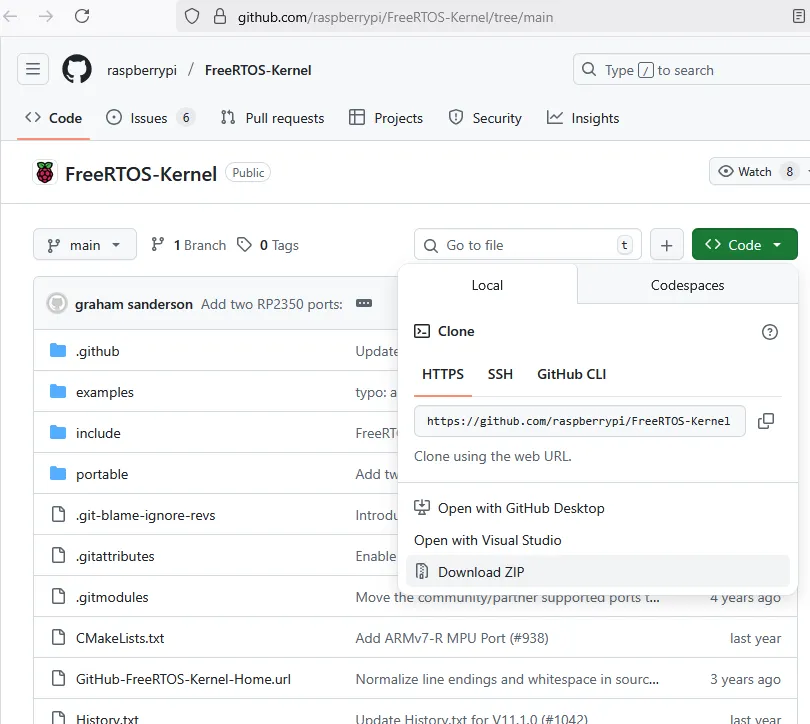
You can either clone the repo or download a zip.
Add FreeRTOS to the project
Section titled “Add FreeRTOS to the project”First, copy the FreeRTOS-Kernel-main folder to the project you created.
Then copy the file
FreeRTOS-Kernel-main\portable\ThirdParty\GCC\RP2350_ARM_NTZ\FreeRTOS_Kernel_import.cmake
to the root of the project, where the CMakeLists.txt file is.
Modify CMakeLists.txt
Section titled “Modify CMakeLists.txt”Add the following to CMakeLists.txt to include the file you just
copied and let CMake know where the FreeRTOS files are located.
# Add FreeRTOSset(FREERTOS_KERNEL_PATH "${CMAKE_CURRENT_LIST_DIR}/FreeRTOS-Kernel-main")include(FreeRTOS_Kernel_import.cmake)
# FREERTOS: FreeRTOSConfig.h needs to be in the include pathtarget_include_directories(FreeRTOS_pico2w PRIVATE ${CMAKE_CURRENT_LIST_DIR})
# Add the FreeRTOS library to the buildtarget_link_libraries(FreeRTOS_pico2w        FreeRTOS-Kernel-Heap4)
Add FreeRTOS configuration file
Section titled “Add FreeRTOS configuration file”Download the files FreeRTOSConfig.h and
FreeRTOSConfig_examples_common.h from
https://github.com/raspberrypi/pico-examples/tree/master/freertos and add
them to the root of the project.
Add support for static allocation
Section titled “Add support for static allocation”In embedded systems, we are often required to use static allocation of
memory. This needs to be enabled in
FreeRTOSConfig_examples_common.h. Find and edit the following section:
/* Memory allocation related definitions. */#ifndef configSUPPORT_STATIC_ALLOCATION#define configSUPPORT_STATIC_ALLOCATION 1#endif#ifndef configSUPPORT_DYNAMIC_ALLOCATION#define configSUPPORT_DYNAMIC_ALLOCATION 1#endifNow we have to provide FreeRTOS with the required functions to provide static memory for the IdleTask, PassiveIdleTask, and TimerTask. Use the file from https://github.com/carlk3/FreeRTOS-FAT-CLI-for-RPi-Pico/blob/master/src/FreeRTOS%2BFAT%2BCLI/src/freertos_callbacks.c.
Add freertos_callbacks.c to the list of files in the add_executable
section of CMakeLists.txt:
# Add executable. Default name is the project name, version 0.1add_executable(FreeRTOS_pico2w FreeRTOS_pico2w.cpp freertos_callbacks.c)freertos_callbacks.c has a section that includes RP2040.h and
RP2350.h, but those files are not found in the source code we use, so
comment that section out:
/*#if PICO_RP2040# include "RP2040.h"#endif#if PICO_RP2350# include "RP2350.h"#endif*/Create a basic FreeRTOS program
Section titled “Create a basic FreeRTOS program”Use the one from https://github.com/raspberrypi/FreeRTOS-Kernel/blob/main/examples/cmake_example/main.c.
Modify the code to add initialization of stdio to the main method and
printf a message from the task loop, like this:
static void exampleTask( void * parameters ){    /* Unused parameters. */    ( void ) parameters;
    for( ; ; )    {        printf("Task 1\r\n");        /* Example Task Code */        vTaskDelay( 100 ); /* delay 100 ticks */    }}/*-----------------------------------------------------------*/
int main(){    stdio_init_all();
    static StaticTask_t exampleTaskTCB;    static StackType_t exampleTaskStack[ configMINIMAL_STACK_SIZE ];
    ( void ) printf( "Example FreeRTOS Project\n" );
    ( void ) xTaskCreateStatic( exampleTask,                                "example",                                configMINIMAL_STACK_SIZE,                                NULL,                                configMAX_PRIORITIES - 1U,                                &( exampleTaskStack[ 0 ] ),                                &( exampleTaskTCB ) );
    /* Start the scheduler. */    vTaskStartScheduler();
    for( ; ; )    {        /* Should not reach here. */    }
    return 0;}
Compile, run, and open the Serial Monitor in VS Code (or another terminal program). You should now see the program starting and the message from the task.
Optional: set optimization level
Section titled “Optional: set optimization level”The compiler sometimes optimizes the code in a way where code is removed
or restructured. This can make the debugging session a bit weird. To
disable this, open CMakeLists.txt and add the following section, which
disables optimization (sets the compiler flag -O0 and prevents inlining
of code):
target_compile_options(blink PRIVATE -O0 -g -fno-inline -fno-inline-functions)Add it after the target_link_libraries(blink pico_stdlib) section.